

Documentation Index
Fetch the complete documentation index at: https://mezmo-9a59581a-mintlify-926f893d.mintlify.app/llms.txt
Use this file to discover all available pages before exploring further.
This feature is only available for customers on an Enterprise plan, and is restricted to Owner and Admin user roles. Please contact your Customer Support Manager or support@mezmo.com for more information.
Step 1: Get Your Mezmo Single Sign On URL
- In your Mezmo app go to Settings > Organization > Access Management.
- Go to SAML Configuration and copy the URL under Single Sign On URL.
- Keep this URL available since it will be used in Step 2: Configure Okta.
Step 2: Configure Okta
- In Okta go to Applications > Applications.
- Click Create App Integration.
- In the window, choose SAML 2.0.
- Fill out General Settings.
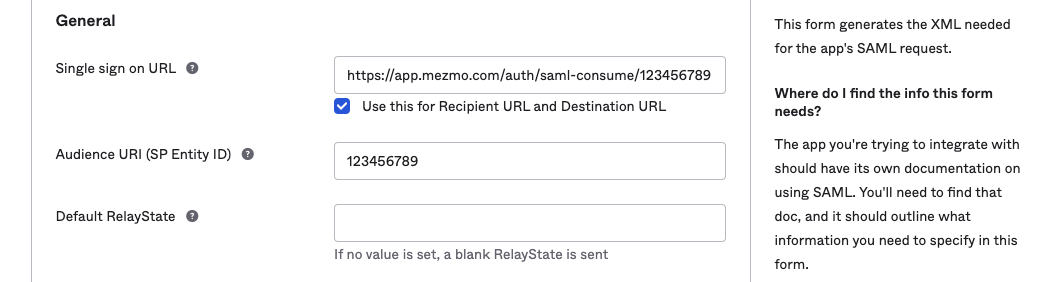
- In the next window, enter the Mezmo single sign on URL from Step 1: Get Your Mezmo Single Sign On URL
- Make sure Recipient URL and Destination URL are checked.
- Set the Audience URI (SP Entity ID) to your account ID. At the end of your URL. For example,
https://app.mezmo.com/auth/saml-consume/<AccountID>. You can leave the rest of the options as is. - Fill out step 3 Feedback.
Step 3: SAML Configuration
- In Okta, on the settings page, click the button; View SAML setup instructions.
- If not already done, in Mezmo, select configure manually.
- Copy the Identity Provider Single Sign-On URL in Okta to Identity provider sign-in URL in Mezmo.
- Download the X.509 Certificate from Okta and upload it to Mezmo.
- Save your config in Mezmo.
- You can also copy and save the XML data on Okta under Optional and upload it to Mezmo.